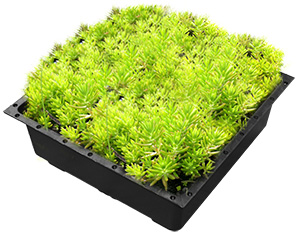
How to Install Modular Green Roof Trays
Modular trays can simplify rooftop planting, but a successful installation still depends on the complete roof assembly. Structural capacity, waterproofing, drainage, wind exposure, fire requirements, safe access, vegetation and irrigation must all be resolved before trays are placed.
This guide outlines a typical coordination and installation sequence for project teams. It is not a structural design, roofing specification or site-specific method statement. The architect, structural engineer, waterproofing provider, landscape professional and installer should confirm the final build-up and procedures for each project.
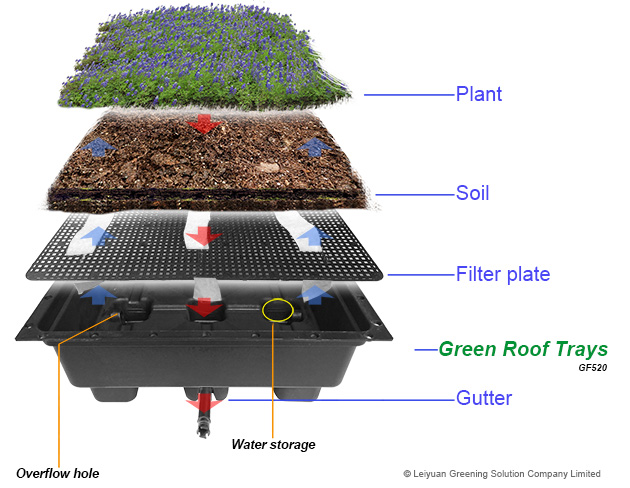
Modular Green Roof Tray Installation Sequence
- Confirm the approved roof assembly and project responsibilities.
- Verify structural loading, drainage, waterproofing and safety provisions.
- Inspect and release the completed roof before landscape work begins.
- Mark drains, edges, penetrations, access routes and tray zones.
- Install the specified protection or separation layers.
- Stage and place the trays in accordance with the approved layout.
- Complete perimeter, wind, drainage and service-access details.
- Add the specified growing medium, vegetation and irrigation.
- Inspect, test, document and hand over the completed system.
1. Confirm the Project Basis Before Materials Reach the Roof
Begin with the approved roof plan, landscape plan and system build-up. The design team should confirm the intended planting zones, tray type, growing-medium depth, vegetation, irrigation approach, access routes and maintenance requirements.
The structural review must consider the complete installed condition, not the empty tray alone. Relevant loads may include saturated growing medium, mature vegetation, tray components, protection layers, irrigation, retained water, maintenance access and temporary construction staging. Pallets or bulk materials should only be placed in locations approved for the resulting concentrated load.
The project team should also resolve roof slope, primary and overflow drainage, perimeter and corner wind zones, fire breaks where required, roof penetrations, service access and the interface with paving or other rooftop finishes.
2. Inspect and Release the Waterproofed Roof
Tray installation should begin only after the waterproofing work is complete and the roof has been accepted for the next trade. Carry out the membrane-integrity or leak-detection procedure required by the project specification and waterproofing provider, then record the condition of the roof before covering it.
Confirm that roof drains and overflow routes are operational and that water can reach them without obstruction. Protect the finished membrane from tools, pallet movement, sharp edges and unnecessary foot traffic throughout the installation.
A green roof tray is part of the landscape and water-management build-up; it does not replace the primary waterproofing system. A root-resistant layer, protection mat or separation layer may also be required, depending on the approved roof assembly.
3. Set Out the Installation Zones
Mark the tray layout from a surveyed datum or another reference shown on the approved drawings. Identify all roof drains, overflows, parapets, penetrations, rooflights, mechanical equipment, inspection zones, fire breaks and maintenance paths before placing the first tray.
Keep drains and critical roof interfaces visible and accessible. Where inspection chambers, gravel margins, pavers or service zones are specified, establish these areas before filling the field with trays. Do not assume that the tray layout can cover or restrict access to a roof drain.
4. Plan Safe Lifting, Delivery and Staging
Coordinate the lifting plan, delivery sequence and roof-level storage with the main contractor and site safety team. Distribute materials in accordance with the approved loading plan and avoid creating concentrated loads at roof edges or other sensitive areas.
Keep access routes clear and protect completed roofing work during transport across the roof. Trays, growing medium and plants should be handled in a way that avoids damage, contamination and uncontrolled material loss in windy conditions.
5. Install the Specified Protection and Separation Layers
Place protection mats, separation fabrics, root barriers or other layers exactly as required by the project assembly. Maintain the specified laps, upstands and interfaces around penetrations and drains.
Do not substitute, omit or rearrange layers because the trays appear to provide a protective function. Changes to the roofing build-up can affect drainage, root resistance, membrane compatibility and warranty conditions and therefore require approval from the responsible design and roofing parties.
6. Place and Connect the Trays
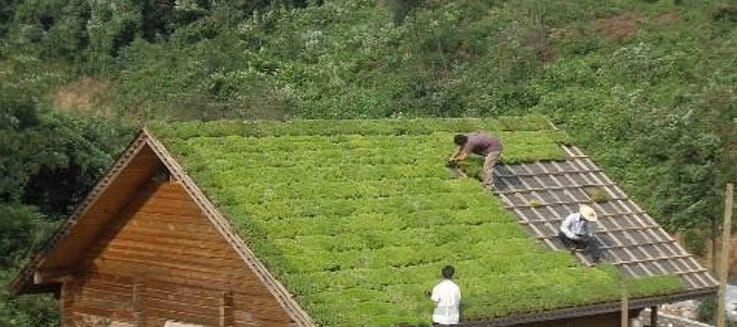
Begin from the approved setting-out line and place trays in the planned sequence. Seat each tray fully on the prepared surface, maintain alignment and engage the designed connection points without forcing or deforming the components.
Check the field regularly rather than waiting until the entire area has been placed. Trays should remain stable, aligned and free from rocking, trapped debris or unintended gaps. Do not drill, cut or modify trays—or penetrate the waterproofing—unless the project drawings and product instructions expressly allow it.
Where more than one tray model or planting depth is used, keep the transition in the location shown on the approved layout. Shallow extensive and deeper semi-intensive zones may require different loading, irrigation, edge and planting details even when the basic placement sequence is similar.
7. Complete Perimeters, Drainage and Roof Interfaces
Install perimeter restraints, wind-related measures, inspection chambers, drainage access zones and transitions to hard landscaping as detailed by the project designer. Edge and corner areas can experience different wind conditions from the central roof field and should not be treated as interchangeable.
Make sure excess water has a continuous route to the designed outlets. Growing medium, geotextile, vegetation and construction debris must not block drains, overflows or inspection openings. Do not rely on the weight of trays or growing medium as a substitute for a project-specific wind design.
8. Add Growing Medium and Vegetation
Use the growing medium and vegetation specified for the project. Place the medium to the designed depth and avoid excessive compaction, contamination or spill into drainage zones. Maintain clean separation between planting areas and gravel, paving or service routes.
For on-site planting, distribute plants according to the landscape schedule and water them promptly. Pre-vegetated trays should be handled carefully to protect plant cover and root structure. Replace any damaged or unsuitable plants before handover.
9. Install and Test Irrigation Where Required
Irrigation requirements depend on climate, exposure, vegetation, growing-medium depth and the project's maintenance strategy. Establishment watering may be needed even when permanent irrigation is not part of the final design.
Where an irrigation system is specified, coordinate the pipework and controls before access becomes restricted. Test the system, confirm coverage and correct leaks or blocked outlets before final completion. The maintenance plan should state who will operate, inspect and adjust the system after handover.
10. Inspect, Document and Hand Over
Complete a joint inspection before the area is accepted. At minimum, verify that:
- roof drains, overflows and inspection points remain accessible;
- trays are seated, connected and aligned as designed;
- protection layers and visible roof interfaces are undamaged;
- perimeter, wind and transition details are complete;
- growing-medium depth and planting match the approved schedule;
- irrigation, where provided, has been tested;
- loose material and construction debris have been removed; and
- as-built information, product records, warranties and maintenance responsibilities are documented.
Take photographs of critical interfaces before they are concealed. A clear handover record makes future roof inspection and maintenance more reliable.

Safety and Engineering Boundaries
Green roof installation is roof work and must be planned accordingly. Use the fall-protection, lifting, personal protective equipment, weather and electrical controls required by the site and local law. Stop work when wind, heat, cold, rain or roof conditions make handling or access unsafe.
This guide does not determine whether a roof can support a green roof, whether a membrane is compatible with a proposed build-up, or what wind, fire, drainage or edge details are required. Those decisions belong to the qualified project professionals and relevant authorities. Follow the approved drawings, local codes, waterproofing requirements and the current instructions for every component used.
After Installation: Maintenance Priorities
The completed roof should be inspected in accordance with the project maintenance plan and after significant weather events. Typical checks include plant establishment, irrigation performance, weeds, erosion or media movement, tray alignment, perimeter conditions and unobstructed roof drains.
Individual trays may provide convenient access to localized areas, but removal should be controlled so that plants, connectors, protection layers and the waterproofing system are not damaged. Record maintenance work and any changes to the installed layout.

Modular Green Roof Tray Installation FAQ
Do modular trays replace the roof waterproofing?
No. The trays sit above an approved waterproof roof assembly. The project may also require root resistance, protection and separation layers.
Can green roof trays be installed on any existing roof?
Not automatically. A qualified structural assessment, roof-condition review, drainage check and project-specific design are required before a retrofit proceeds.
Can trays be placed directly over the membrane?
Only when the approved roof assembly and waterproofing provider permit it. Many projects require a protection or separation layer between the membrane and the tray system.
Do modular green roof trays always need irrigation?
No single answer applies to every roof. Climate, vegetation, exposure, growing-medium depth and establishment needs determine the irrigation strategy.
How should roof drains be treated?
Drains and overflows must remain functional, visible for inspection and accessible for cleaning. Follow the project details for inspection chambers, clear zones or gravel margins.
Can the same installation detail be used at roof edges and in the central field?
Not necessarily. Edge and corner zones may have different wind and fire requirements. Use the project-specific details rather than assuming one layout applies everywhere.
Project References
The following sources are useful starting points for project teams working in the United States. They are general project references, not LEIYUAN product certifications. Projects in other markets should follow the applicable local codes, standards and authority requirements.
- U.S. General Services Administration: Planted Roof
- ANSI/SPRI RP-14: Wind Design Standard for Vegetative Roofing Systems
- U.S. OSHA: Green Roof Safety and Hazards
Choose the Tray System Before Installation Planning
Installation planning should follow product and planting selection. HT-508 is intended for shallower extensive applications, while HT-5020 supports deeper semi-intensive planting. The complete design must still be checked against roof loading, drainage, wind, fire, vegetation and maintenance requirements.
Compare HT-508 and HT-5020 modular green roof trays, or send us the project location, roof area, roof slope, intended vegetation and design-stage loading information for an initial product discussion.
Last reviewed: August 2026. This page provides general coordination guidance and does not replace project-specific engineering, roofing or landscape documentation.